How permissions, access scopes, and roles work together is described in Permissions concept.
Within this section, you can set up custom user roles for your accounts. Furthermore, you can grant access to different niotix modules for each account.
Modules
niotix provides a module-based approach to extend and tailor its functionality. A module in niotix is similar to an app for a smartphone: It is not part of the core niotix-functionality, can be provided by 3rd parties (beside DIGIMONDO) and needs to be activated separately. In comparison to the core features of niotix, the modules aim to provide business users tailored solutions for certain use cases.
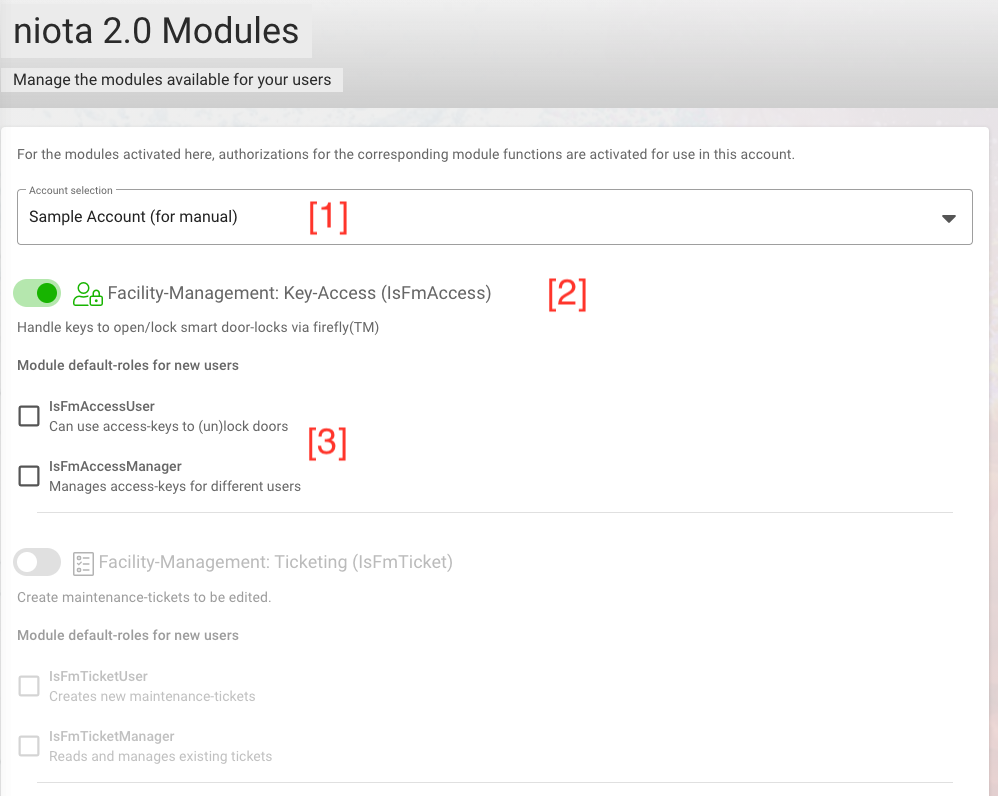
To grant access to existing modules, you first need to select the account for which you want to define the module settings [1]. Depending on the type of installation (on premise or SaaS) and granted permissions by the system administrator, you can see different types of modules.
You activate a module with the toggle button [2]. Furthermore, for each module you can decide if certain, module specific permissions should automatically be assigned to new users, so that they can use the module [3].
Retention Policy
With the appropriate permissions as a system administrator, you can customize the retention periods of Digital Twin data points for sub-accounts. The default retention value for data points before they are removed from the database, which is also used by our SaaS system, is 24 months.

Integrations
Integrations are 3rd-party-systems, which are not part of the niotix core system, but which are integrated via an internal interface.
With the toogle-button for each integration, you can activate an integration for your account or for sub-accounts. IMPORTANT: Once activated, an integration cannot be deactivated anymore.
- IoT Data Hub Influx Database: This activates the faster Influx database to persist device data. It is prerequisite for using Grafana
- Dashboard Instance: This starts a Grafana instance to visualize IoT data
- IEC-60870-5-104 consumer: If installed by Digimondo, you can activate the interface to IEC104-based SCADA-systems. Please contact Digimondo if you are interested in using this integration
- States Influxdb Datasource: This activates the faster Influx database to use states of digital twins in Grafana.
Role Editor
With the role editor, you can define own roles for your accounts. Use the role editor to represent your organizational roles with individual names and permissions.
This page is separated into 2 tabs:
- Default role wizard: Select the default roles applied to new users for each scope (digital twin).
- Role editor: Configure individual roles and edit existing roles for your account (tenant).
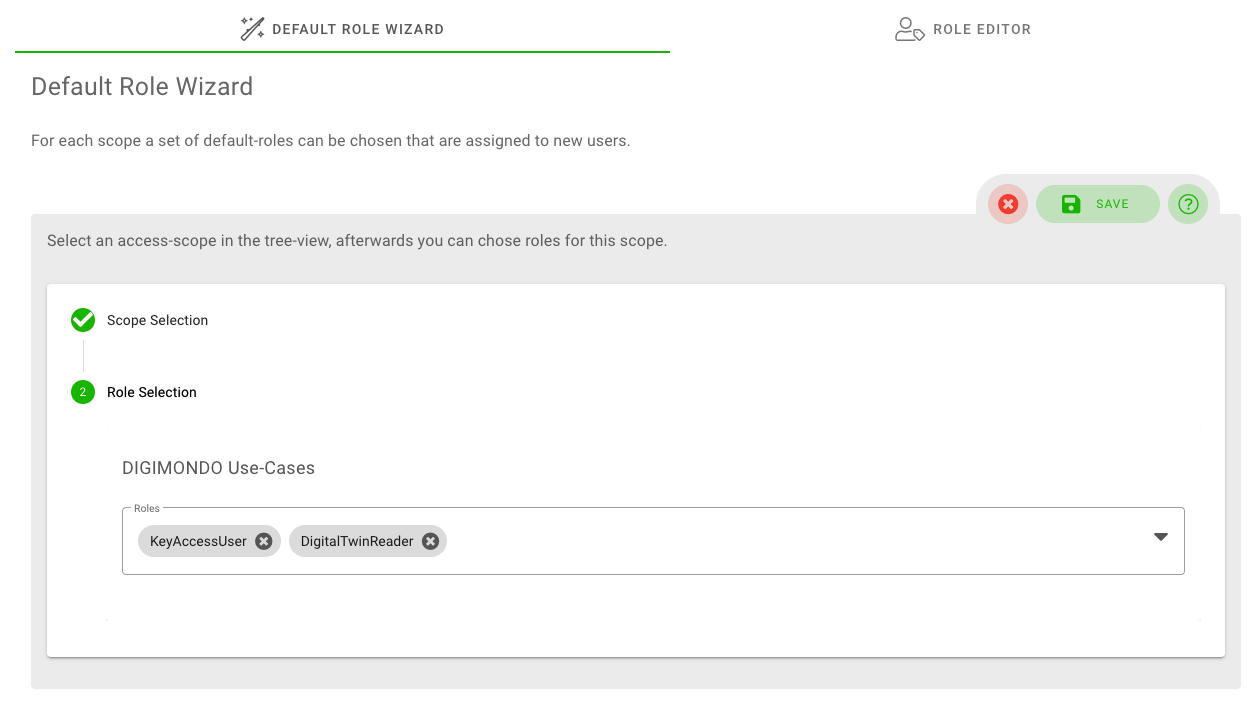
Tab ‘Default Role Wizard’
With the default role wizard, you can define which roles are per default assigned to new users for the selected scope. This default setting is applied when you create a new user and do not change the scope-permissions. It helps you to save effort and ensure that new users always get the same permissions for individual digital twins.
First, select the scope for which you want to define the default roles. Then, select the default roles from the dropdown list. To finish, simply click on the “save”-button.
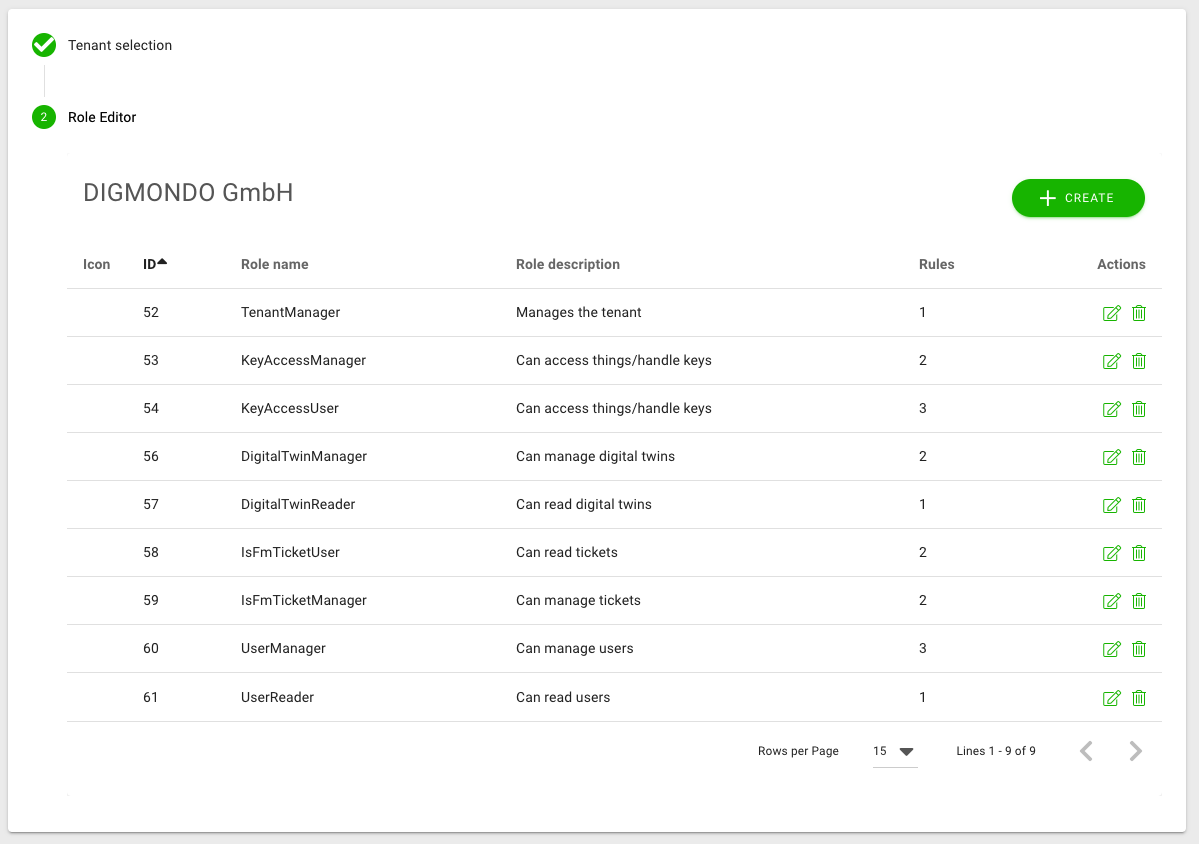
Tab ‘Role Editor’
With the role editor, you can define new and customize existing roles by selecting fine-granular permissions.
To do so, first select the account for which you want to customize the roles. In the next step, you get an overview of existing roles for this account. To delete a role, click on the “trashbin” button for each row. To edit a role, click on the “pen & paper” button. If you want to create a new role, click on the “create” button.
IMPORTANT: A role always belongs to an account. This means, that a role which you define is only visible to (and usable for) the account for which it was defined.
Add new
To add a new role, you need to set up following fields:
- Role name: the name of the role
- Role description: a short description of the role’s purpose
- Icon: Select an icon which represents your role best (optional).
- Rules: Select the applied rules (permissions; see description below) from the dropdown list by activating the corresponding checkboxes.
Existing rules (permissions)
niotix has a powerful access management with fine-granular rules (permissions) to customize how users can interact with the system. For each role, you can assign different rules.
In general, each rule refers to a data objects in the system and is split into “permission for reading”, “permission for writing/editing” and “permission for creating new data objects”. These permissions are not necessarily equal to visual access to the menu items (e.g. reading a digital twin without access to the user interface is used by some niotix modules). Other than that, permissions to an account are inherited to its children (sub-accounts).
The following list gives you and overview of basic rules in niotix:
- All.manage:
- Gives access to all niotix features incl. full rights to edit, delete, create etc. (“everything an account-admin needs to access”): menu “Home”, “Digital twins”, “IoT Data Hub”, “Connected Systems", “Settings”, “System logs”, “rest API", “Overview”
- Should show only content (accounts, twins, etc.) from the corresponding account and its sub-accounts (not parents)
- In IoT Data Hub, it allows the following:
- General behavior: the user can see, edit and delete everything from his account and the sub-accounts
- Applications: See, edit and delete applications of the account and its sub-accounts
- Consumers: See, edit and delete consumers of the account and its sub-accounts
- Devices: See, edit and delete devices of the account and its sub-accounts
- Device Types: See, edit and delete all device types of the account, parental account, and sub-accounts, which have the visibility ‘everyone’, are visible. But only device types of the account are editable (not devices on the same hierarchy level are not visible, eg. customer X, customer Y)
- Gateway Management: You can create new gateways for your account or its subaccounts, edit existing gateways, and delete gateways.
- Device Monitoring: All critical devices of the account you are logged in to and its sub-accounts are visible and filterable by accounts. You can edit the devices or create new devices of/ for your account and of/ for its sub-accounts.
- Gateway monitoring: All critical gateways of the account you are logged in to and its sub-accounts are visible and filterable by account. You can also create an email notification for you and other users in the system for critical gateways that are on alert. Please note that recipients who do not have the all.manage permission will also receive the list of critical gateways accessible to you.
- Data Sources: See the data sources, but can not edit them
- Originators: See the originators of the account by which you are logged in and its sub-accounts and edit them.
- Dashboard Builder: Reporting instance(s) of the account you are logged in to and its sub-accounts are visible in the query. You can see, edit existing, and create new dashboards for this account and for its sub-accounts.
- Service Builder: All service builder instances of all accounts where the user has IotHub.manage or all.manage permission (not the sub-accounts of these accounts!)
- All.read:
- Gives readable access to niotix features relevant for users without any mutation rights: “Digital Twins”, “IoT Data Hub”, “Dashboard Builder”, “LoRaWAN system”, “Settings”, “Overview”
- No access to: niotix-moduls (e.g. warning app, ticket management), Connected Systems > IoT Service Builder Instances
- Use for demo accounts that can only be viewed by third parties (e.g. resellers who want to make the system and implemented use cases available to third parties)
- Dashboard: Controls access to dashboards.
- Dashboard.manage: Allows dashboards to be read, created, edited and deleted.
- Dashboard.read: Allows dashboards to be read.
- DeviceDriver: Controls access to device drivers.
- DeviceDriver.Manage: Allows device drivers to be read, created, edited and deleted/deactivated.
- DeviceDriver.Read: Allows device drivers to be read.
- DeviceTemplate: Controls access to device templates. Please note that additionally at least DigitalTwin.read and VirtualDevice.read must be available for opening/editing.
- DeviceTemplate.manage: Allows device templates to be read, created, edited and deleted.
- Devicetemplate.read: Allows device templates to be read.
- DigitalTwin: This defines how (if) users can use the digital twin.
- DigitalTwin.list:
- menu “Digital Twins” is not shown, but should be needed to access digital twins in the background (e.g. for pinning twins to the “home”-page, using the warning-app)
- can also be used together with DigitalTwinStates.read to access the “Overview” page
- DigitalTwin.read:
- Shows the menu “Digital Twin” with sub-twins
- Shows the menu “Dashboard Builder”
- Allows to see the details of a digital twin incl. states, rules, etc.
- Allows to pin twins to “Home”-page
- Allows to read all twins and states in “Overview”
- Where DigitalTwin.list is required, a DigitalTwin.read can also be used
- DigitalTwin.write:
- allows to create new twins and edit existing digital twins, but can not delete/disable them
- can create and edit states and rules, but not delete them
- DigitalTwin.manage:
- allows to read, create, edit and delete/ disable digital twins
- allows to create states and rules for twins
- allows to see and edit Grafana dashboards
- DigitalTwin.list:
- DigitalTwinStates: This defines how (if) users can use the states and rules of a digital twin.
- DigitalTwinStates.read:
- Should not do any changes to the UI - but is needed to give other modules and pages access to digital twins (e.g. the Object-Management-App, Warning-App-Monitor)
- To be used together with DigitalTwin.list, if no full-read-access to twins should be granted
- DigitalTwinStates.read:
- IotHub.manage:
- has access and edit/create rights to (equals the former n1.0-role “User”):
- General behaviour: The user can see, edit and delete everything from his account (not from sub-accounts)
- Applications: all applications of the account (not the sub-account)
- Consumers: all applications of the account (not the sub-account)
- Devices: All devices of the account (not the sub-account)
- Device Types: all device types of the account and device types of parental accounts, which have the visibility ‘everyone’, are visible. But only device types of the account are editable.
- Gateway management: All gateways of the account (not sub-account) are visible. You can create new gateways for your account, edit or delete existing gateways.
- Service Builder: All service builder instances of all accounts where the user has IotHub.manage or all.manage permission (not the sub-accounts of these accounts!)
- Dashboard Builder: Only reporting instance(s) of the account you are logged in to are visible in the query. You can only see, edit existing and create new dashboards for this account (Grafana admin role), not for the sub-accounts.
- Device Monitoring: All critical devices of the account you are logged in are visible, you can not filter by accounts. You can edit the devices or create new devices for your account.
- Gateway Monitoring: All gateways rated as critical for the account you are logged into are visible and can be filtered by the warning and alert level. You cannot filter by account. In addition, you can create an email notification for you and other users in the system for critical gateways that are in the alert level. Please note that recipients who do not have this authorisation will also receive the list of critical gateways accessible to you.
- Originators: See the originators of the account by which you are logged in. You can only edit the originators of this account.
- has access and edit/create rights to (equals the former n1.0-role “User”):
- IotHub.read:
- General behaviour: the user can see (not edit) everything from his account (not sub-accounts).
- Has readable access to (equals the n1.0-role “Read Only”):
- Applications: all applications of the account (not the sub-account)
- Consumers: all consumers of the account (not the sub-account)
- Gateway Management: All gateways of the account (not of the sub-account) are visible.
- Devices: all devices of the account (not the sub-account)
- Device Types: all device types of the account are visible
- Device Monitoring: Only the critical devices and their information of the account you are logged in, are visible. You can not filter by accounts.
- Gateway Monitoring: All gateways rated as critical for the account you are logged into are visible and can be filtered by the warning and alert level. You cannot filter by account. In addition, you can create an email notification for you and other users in the system for critical gateways that are in the alert level.
- Originators: Only see the originators of the account in which you are logged in, but you cannot edit them.
- No access to: Data Sources, Service Builder, Dashboard Builder, Gateway Management & Gateway Monitoring (despite the additional permission Gateways.manage)
- IsFmAccess.manage:
- Should include the same features as IsFmAccess.write
- Should allow to create keys if the permission usermanagement.read and digitaltwin.list or digitaltwin.read/manage is also given
(Info: A twin can only be selected if with tag “Building”/”Room” or has type building /room and the door-id is set)
- IsFmAccess.write:
- allows to access the menu “Key-Ring” and use the key(s)
- Keychain is only visible, if a key is assigned to the user
- IsFmTicket.create:
- Should display a “+”-icon on the top right corner to add new tickets
- Should show the tile “create new ticket” on the “home”-page if no digital twin is marked as favourite
- Should show the menu-item “object mgmt > create ticket” if IsFmTicket.read is also granted (tbd)
- Should allow to create a new ticket (if the permission digitaltwin.list is granted as well to be able to select a twin)
- Should not allow to see the list of existing tickets
- IsFmTicket.manage:
- includes the same features as IsFmTicket.create and IsFmTicket.read
- enthält die gleichen Funktionen wie IsFmTicket.create und IsFmTicket.read
- allows to edit and delete existing tickets
- IsFmTicket.read:
- allows to access the menu “object mgmt > tickets”
- displays the “notification” (bell-icon) on the top right
- IsWarnapp.manage:
- includes all permissions of IsWarnapp.read
- displays the menu “administration”, if the module is activated
- lists digital twins in the “administration”, if digitaltwin.manage is assigned as well
- IsWarnapp.read:
- displays the menu “warning monitor”, if the module is activated
- allows to select a pre-configured digitaltwin in the “warning monitor”, if digitaltwin.list is assigned as well
- SystemNotifications.read:
- Sends out notification emails and display a warning-box on the “home”-page if a connector is not working
- UserManagement: This defines how (if) users can use the user management.
- UserManagement.create:
- allows adding new users to the account
- does not allow to create users for sub-accounts or parent accounts
- does not show the list of existing users - except UserManagement.read is also assigned
- UserManagement.impersonate:
- displays a small impersonation-icon in the user-table and allows to impersonate other users (the user-table is only visible if UserManagement.read is granted as well)
- grants the same permissions as the impersonated user - even if this one has more permissions. Consider carefully when you grant this permission.
- UserManagement.read:
- allows to access the menu “settings > accounts”
- allows to see the list of existing users for the account
- does not allow to see users of sub-accounts or parent accounts
- UserManagement.manage:
- includes all permissions from UserManagement.create, UserManagement.read, UserManagement.write
- does not include UserManagement.impersonate (special exception, as impersonate is a special privilege which not every UserManager should receive)
- UserManagement.create:
- VirtualDevice This defines how (whether) users can use virtual devices.
- VirtualDevice.list:
- The ‘Virtual devices’ menu is not displayed, but is required to be able to access virtual devices in the background (e.g. to pin them to the ‘Home’ page)
- can also be used together with VirtualDevice.read to enable access to the ‘Overview’ page
- VirtualDevice.read:
- shows the ‘Virtual Device’ menu
- enables the details of a virtual device to be displayed, including statuses, rules, etc. (exception: fields containing key’s can not be read)
- Enables virtual devices to be pinned to the ‘Home’ page
- Enables the display of Smart Groups. Individual tabs require additional authorisations, e.g. VirtualDevice.manage for alarm reports
- where VirtualDevice.list is required, this authorisation can also be used
- VirtualDevice.write:
- allows new virtual devices to be created and existing ones to be edited, but not deleted/deactivated
- Allows states and rules to be created and edited, but not deleted
- VirtualDevice.manage:
- Allows virtual devices to be read, created, edited and deleted/deactivated (exception: fields containing key’s can not be read)
- Allows the creation of states and rules for virtual devices
- Allows you to view and edit Service Builder, Dashboard Builder
- Allows Smart Groups to be displayed, edited and deactivated
- VirtualDeviceKey.read:
- Allows to read the “key”-fields of a virtual device (e.g. AppKey for LoRaWAN devices)
- VirtualDevice.list:
For a description of all module-specific rules, have a look at the section “modules” in this manual.