An account represents an organization (e.g. a company, a subsidiary, a department, a city). For each account, you can customize connectors, user interface, etc. Like in a real organization, each account has a group of users. Depending on your user rights, you have permission to view and edit accounts and users.
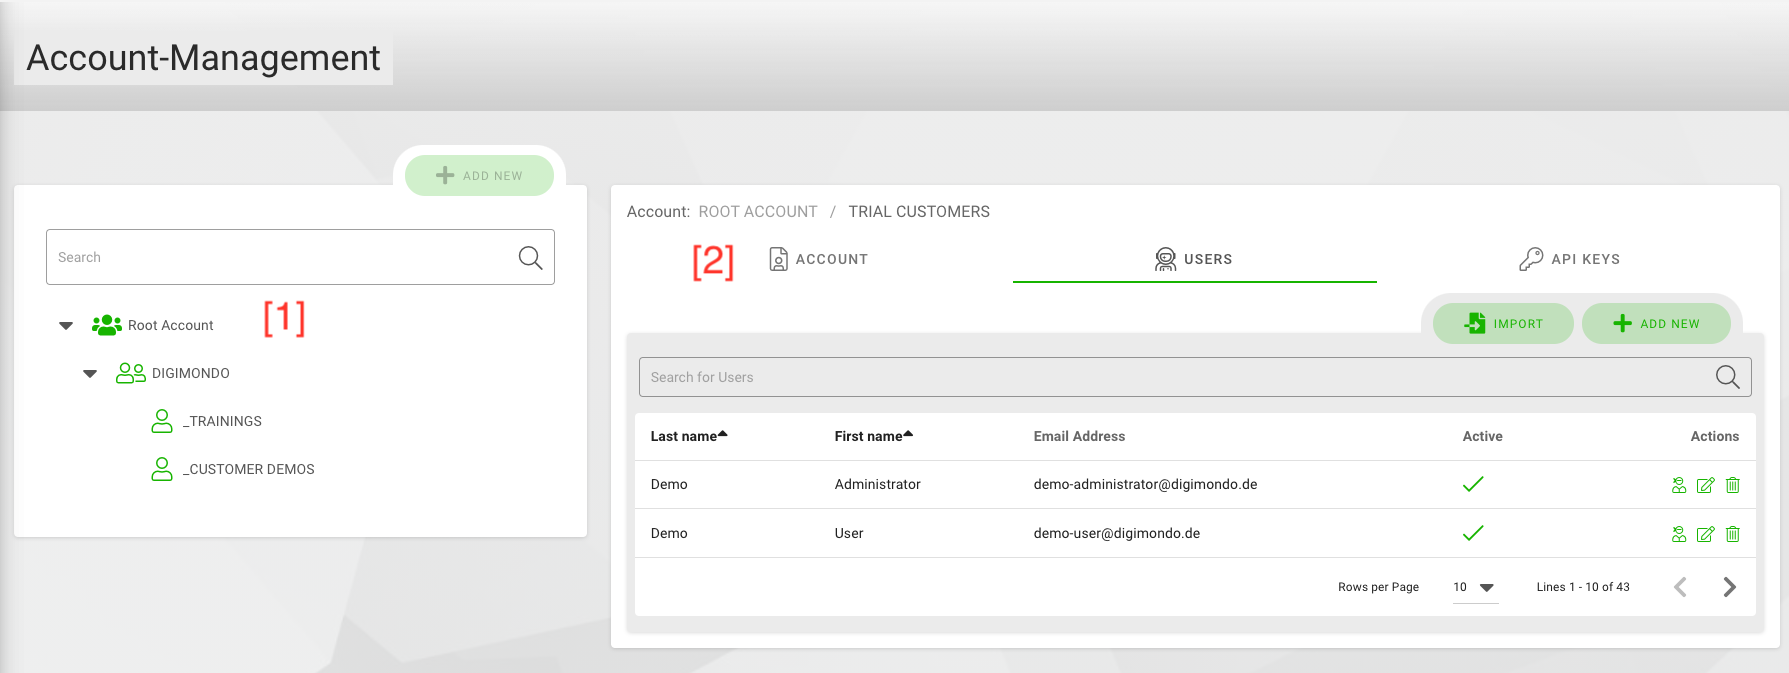
When opening the “Account Mgmt” site, you see the hierarchy of accounts on the left [1] similar to the digital twins. Accounts can have sub-accounts. Depending on your user rights, you can see more or less elements of this hierarchy. You can add a new account by clicking on the “+ add new”-button. Otherwise, you can also select an existing account from the hierarchy. In both cases, you can see the details of the account on the right.
The box with the account details on the right is split into three tabs [2]:
- Accounts: Configure the settings for the selected/new tenant.
- Users: Administrate the users for this tenant.
- API Keys: Administrate API keys for 3rd party applications
Tab ‘Account’
For each account, you can set a description to provide your colleagues and other users more details about the tenant.
Domain Mapping
In the domain mapping, you can add custom domains (URLs) for this account, which are set up by DIGIMONDO or your system administrator. A custom domain gives you the possibility to customize the default user interface right from the login-screen on. After adding a custom domain, you can configure your customization such as logo, colors etc. under “Account Mgmt > System Settings”.
There are two cases to set up a custom domain:
- For DIGIMONDO SaaS customers: Please contact your account manager at DIGIMONDO to set up a custom domain
- For On-Premise customers: Please contact your system administrator to set up a custom domain
To add a new domain, put the URL into the textbox and click on the “+” symbol. You can add more than one domain.
Email Server Settings
Here you can set up a custom system email which is used to send out system emails for this account. System emails are e.g. the welcome email for new users or the email users receive when they reset their password.
User Password Policy
With the user password policy, you define the rules which users need to follow when they change their password. For the highest level of security, activate all checkboxes (“upper- and lower-case”, “numbers” and “special characters”) and define a minimum-length of at least 8 characters.
User properties
You can define custom user properties for your accounts. They are used to add additional information for organizational purposes to each account, e.g. telephone numbers, the corresponding department or the employee role.
To add custom user properties, write your individual attribute name in the “Attribute Key” field. In the user profile, you can add the corresponding individual value for each user. To add more fields click on the “+"-button, to remove fields click on the “trashbin”-button.

Detailed information about different accounts
According to your user rights, you can view the “Detailed information” field, which contains current data about the account, such as update dates, account ID, hierarchy level, number of twins, and number of twins in sub-accounts.
Federated Authentication
Federated Authentication provides the ability for users to log in through third-party identity providers using standard protocols such as OAuth2 and OpenID Connect (OIDC). Both protocols allow you to configure custom clients for your account, enabling user authentication through these providers. Below are the detailed configurations for both OAuth2 and OIDC.
OAuth2 Configurations
You can define custom OAuth2 Clients (Instances) for your account. This enables your users to login using OAuth2 providers of your choice.
Available clients will be displayed to users on the login page.

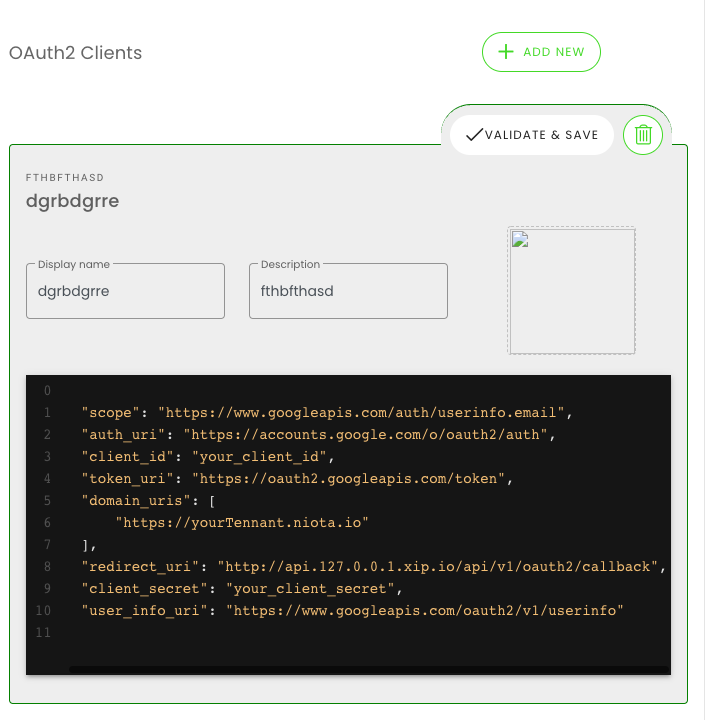
New clients are created by clicking on the “+” button in the “OAuth Clients” section. You can add a name and logo for your Oauth2 provider. The configuration for the client is specified in the code block as a JSON object.
Clients can be saved and edited by clicking on “validate & save”, and deleted by clicking on the “trashbin”-button.
Configuration
In order to allow successful authentication against an OAuth2 provider, a valid JSON object is required. When you click on “validate & save”, you will receive either a success message, showing your configuration is valid, or an error message, showing what properties are missing or invalid.
When you create a new client, a JSON object with all necessary fields will be created automatically for you to fill out:
- client_id: The ID of the service. May be called tenantId, or appId in some OAuth services.
- client_secret: Client Secret provided in your OAuth service.
- auth_uri: The authorization server endpoint URI.
- token_uri: The token server endpoint URI.
- scope: Defines the limit of the access to the user’s account. For niotix’ purposes, only access to the user’s email is required.
- user_info_uri: The user server endpoint URI. This must always return a JSON object, containing the user’s email. ex.:
{ "email": "user@company.com" } - redirect_uri: Determines where the API server redirects the user after the user completes the authorization flow. The required route for niotix is normally
https://<<your_niotix_domain>>/api/v1/oauth2/callback
You may configure as many clients per account and domain as you wish. Only one instance of a client needs to be configured, and it will be available to all sub-accounts and users, logging in at the specified niotix domain.
Once your client configuration is validated and saved, all users logging in from the Account’s domain URIs (see Domain Mapping), will be able to log into niotix using the specified OAuth2 provider.
Important: The redirect_uri domain must match the domain users actually use to log in. Example: https://{yourdomain}/api/v1/oauth2/callback works only when users sign in via https://{yourdomain}.
If you wish to share a niotix URI, which makes only specific clients available, you can do so using the oauthClient query parameter with your clients’ client_ids: https://<<your_niotix_domain>>#/login?oauthClient=<<client_id1>>,<<client_id2>>
Currently, a user needs to be created in niotix first, before they are able to log in, using OAuth2.
Example for Google:
{
    "scope": "https://www.googleapis.com/auth/userinfo.email",
    "auth_uri": "https://accounts.google.com/o/oauth2/auth",
    "client_id": "12837123862-kshfd7frkker7fdskdf.apps.googleusercontent.com",
    "token_uri": "https://oauth2.googleapis.com/token",
    "domain_uris": [
    "niota.io"
    ],
    "redirect_uri": "https://niotix.io/api/v1/oauth2/callback",
    "client_secret": "skdfsd-dgsfssfkjshv7QwBI97P3P8",
    "user_info_uri": "https://www.googleapis.com/oauth2/v1/userinfo"
}
OIDC Configurations
OIDC (OpenID Connect) builds on top of OAuth2, adding identity verification features. OIDC clients can be configured similarly to OAuth2, allowing users to authenticate through providers that support OIDC, such as Microsoft or Google.
Available OIDC clients will appear alongside OAuth2 clients on the login page.
Configuration
For successful authentication against an OIDC provider, you need a valid JSON configuration. The fields for an OIDC client are similar to OAuth2 but include additional properties for identity management.
Here’s an example configuration:
{
    "scope": "openid profile email",
    "auth_uri": "https://login.microsoftonline.com/xxxxxxxx-xxxx-xxxx-xxxx-xxxxxxxxxxxx/oauth2/v2.0/authorize",
    "client_id": "XXXXXX",
    "token_uri": "https://login.microsoftonline.com/xxxxxxxx-xxxx-xxxx-xxxx-xxxxxxxxxxxx/oauth2/v2.0/token",
    "redirect_uri": "https://niotix.io/api/v1/oidc/callback",
    "client_secret": "XXXXXX",
    "user_info_uri": "https://graph.microsoft.com/oidc/userinfo",
    "default_access_roles": [
        "Reader"
    ],
    "id_token_access_roles_claim": "roles",
    "usercreation_custom_field_mapping": {
        "lastName": "family_name",
        "firstName": "given_name"
    }
}
-
scope: Specifies the access permissions for the OIDC client. The openid scope is required for OIDC, while profile and email are commonly included for user information retrieval.
-
auth_uri: The authorization server endpoint URI for the OIDC provider.
-
client_id: The ID assigned to the OIDC client by the identity provider.
-
token_uri: The token server endpoint URI, used to exchange the authorization code for tokens.
-
redirect_uri: The URI where the API server will redirect the user after completing the authorization process (in this case - the Niotix system).
-
client_secret: The secret assigned by the OIDC provider for authentication.
-
user_info_uri: The endpoint where the user’s profile information can be retrieved, typically returning data like the user’s name and email.
-
default_access_roles: (Optional) Specifies default roles automatically assigned to newly created users in Niotix when authenticated through OIDC. These roles are not mandatory and are an addition to the roles received via the OIDC ID token. If no roles are received via the id_token, these are the only roles that a new user will have. Normally these roles should be used only for additional basic access to the Niotix system.
-
id_token_access_roles_claim: The claim that contains the user’s roles in the OIDC provider. This allows role-based access to be mapped from the ID token. The roles from this array are mapped as OIDC_(AccountID)_RoleName in Niotix.
-
usercreation_custom_field_mapping: (Optional) An optional mapping that links fields from the OIDC response (like family_name and given_name) to the niotix user profile fields.
-
custom_subbacount_role_mapping: (Optional) Defines a mapping between OIDC roles from the ID token and Niotix subaccounts associated with the primary account where the OIDC client is configured. This enables fine-grained role allocation for subaccounts.
oidc_role: Specifies the external role name. Each role name must be unique within the configuration.niotix_accountId: Maps the external role to the corresponding Niotix subaccount using its account ID.niotix_scopeId(Optional): Allows assigning a custom scope for the mapped subaccount role. If omitted, the default scope of the subaccount will be used.
Example:
"custom_subbacount_role_mapping": [ { "oidc_role": "SubaccountA-Manager", "niotix_accountId": 4 }, { "oidc_role": "SubaccountA-Reader", "niotix_accountId": 4 }, { "oidc_role": "MainOIDCAccountCustomScope-Manager", "niotix_scopeId": 11, "niotix_accountId": 2 }, { "oidc_role": "MainOIDCAccountCustomScope-Reader", "niotix_scopeId": 11, "niotix_accountId": 2 } ] -
ignore_unmapped_roles: (Optional, Booolean: true or false) An optional config used in conjunction with “custom_subbacount_role_mapping”. It determines how unmapped roles from the ID token are handled:
true: Unmapped roles are ignored, enhancing security and predictability by ensuring only explicitly configured roles are processed.false: Unmapped roles are automatically assigned to the main account that holds the OIDC client configuration. This is the default behavior.
Purpose: This setting is useful for mitigating risks associated with unexpected roles in the ID token. By ignoring unmapped roles, administrators can prevent unintended access.
Like OAuth2, you can configure multiple OIDC clients per account. Users will be able to log in using these clients from the Account’s domain URIs.
Important: It is important to plan how the structure of the account management in your Niotix system will look like and what are the requirements for the access of users. The Niotix OIDC client gives access only to the scope of the account it is configured in and the subaccounts of this account. If a user needs access to multiple accounts of the same hierarchy then the OIDC Niotix client should be configured in a parrent account that contains the said accounts.
Tab ‘Users’
In the users-tab, you can see all of the users for the selected organization as well as all of its sub-organizations.
Single users can be added by using the “add new”-button. If you need to create many users at once, you can use the “import”-button.
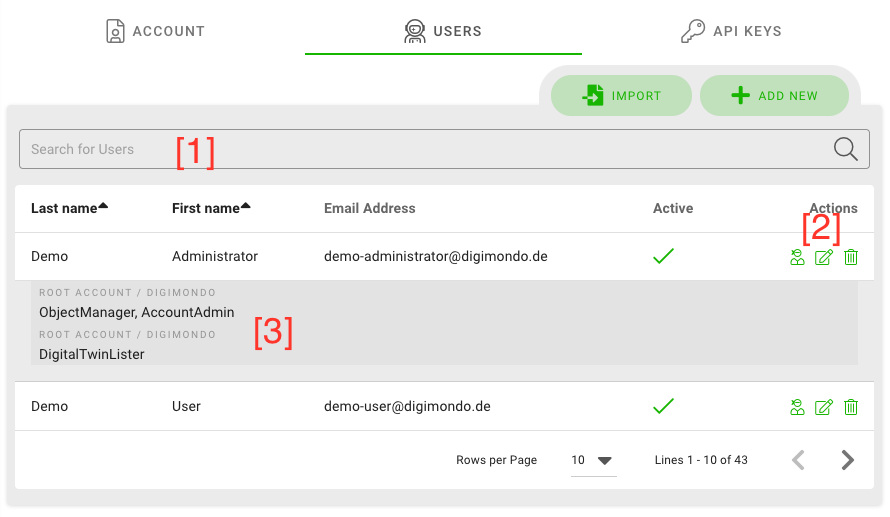
With the search bar, you can search for a certain user in the list [1]. Use the “trashbin”-button to delete the corresponding user or click on the “paper & pen”-button to edit [2]. Depending on your user rights, you can impersonate users by clicking on the “impersonation"-button. To quickly see what roles are assigned to a user, click on the user’s line and the roles appear in a drop-down menu [3].
Impersonate user
If you click on the above mentioned “impersonation” button, you temporarily imitate this user. You have the same views and permissions as the selected user, which is useful to give support to your users.
Impersonation is indicated on the top bar with a red box. To leave the impersonation mode, click on the “return” icon in the red box.
![]()
Edit user
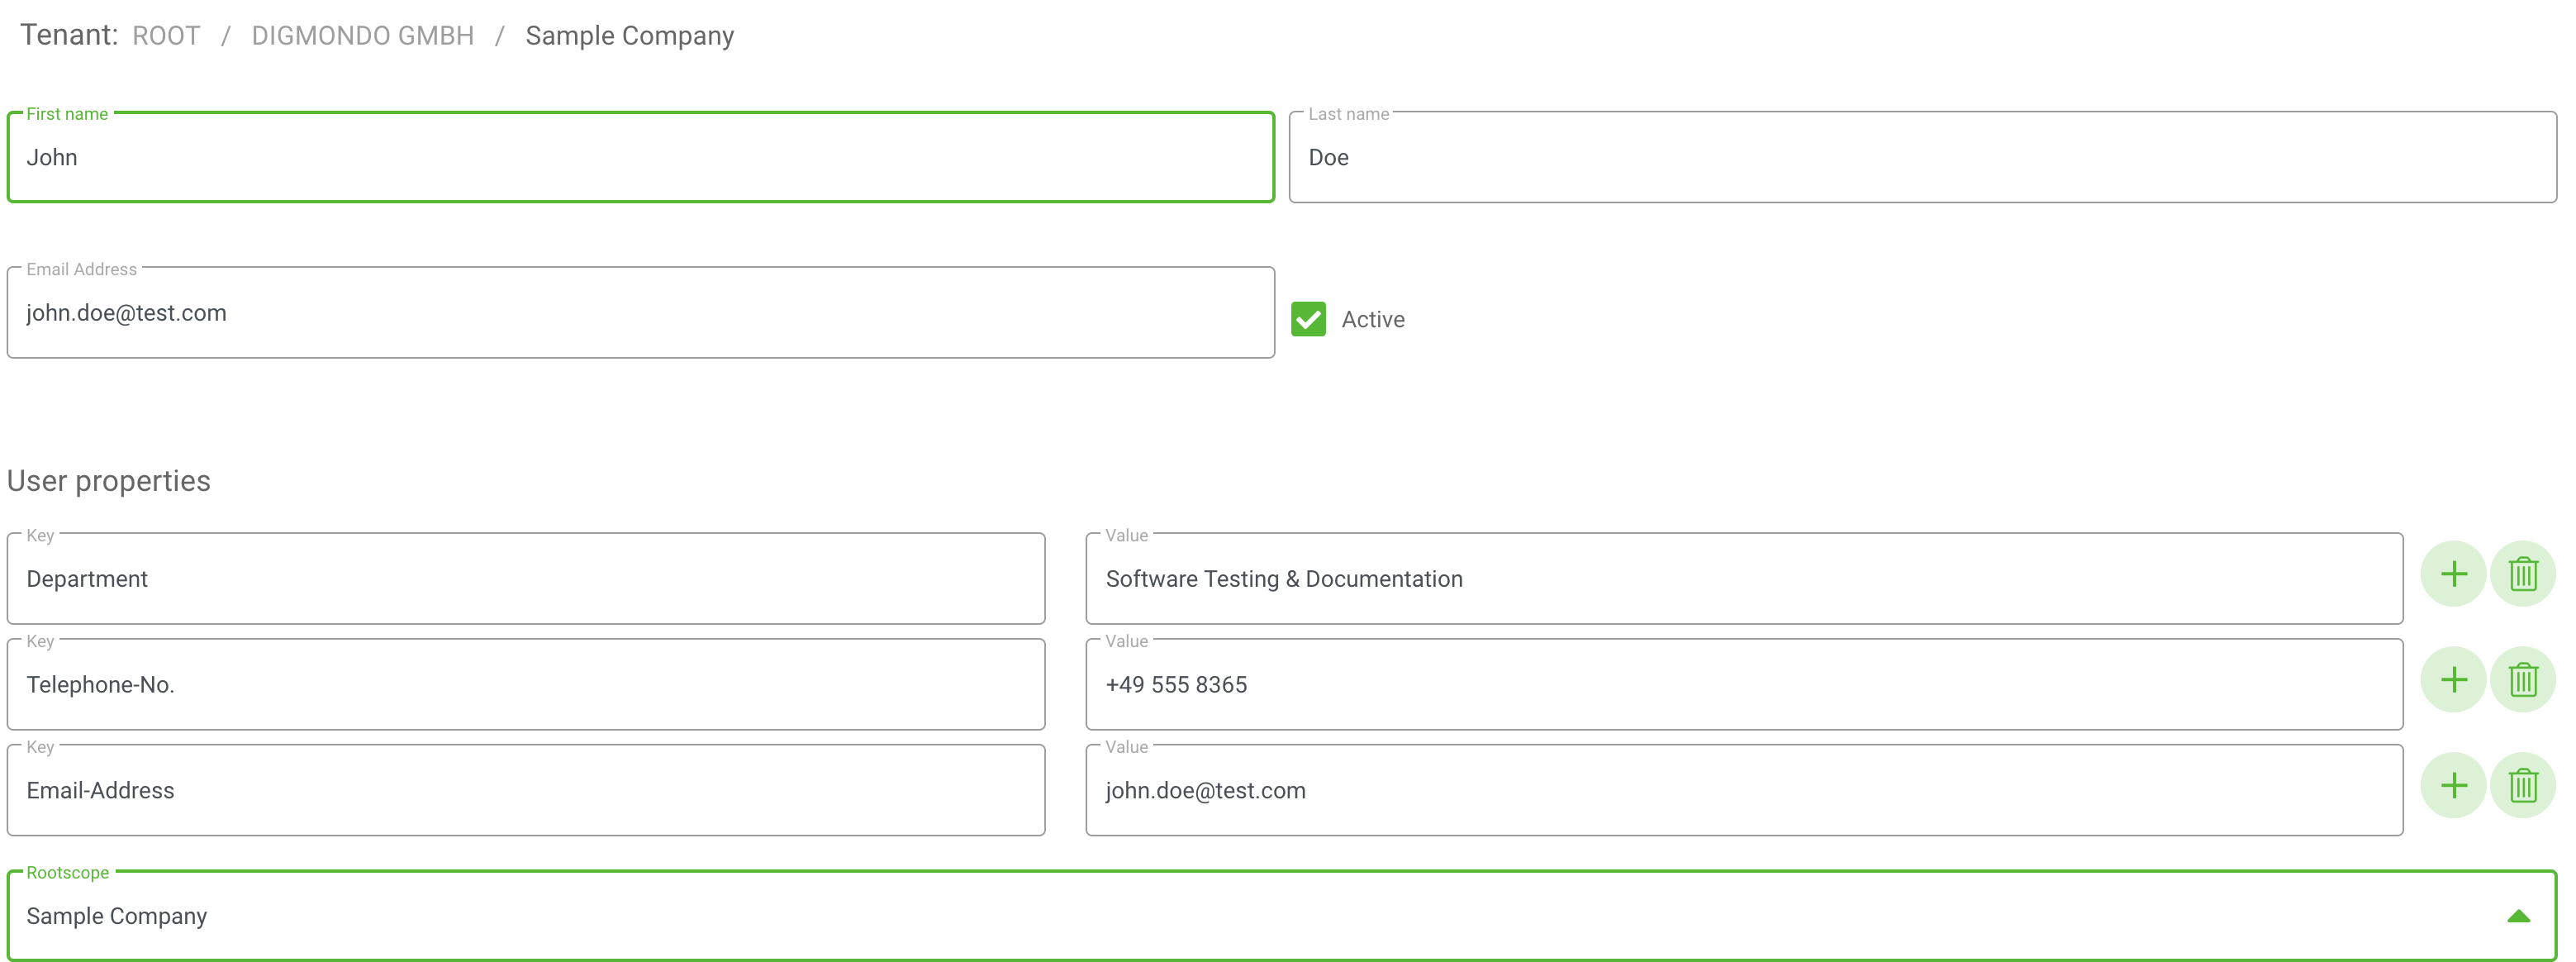
If you click on “edit” (see [2] in picture above), you can edit the selected user:
- First name: the user’s first name
- Last name: the user’s last name
- Email address: The user’s email address – this must be a valid email because the invitation to niotix will be send to this email address.
- Active: With this box you can decide if the user account is activated or not. If this checkbox is deactivated, the new user cannot log into niotix.
- User properties: Add the values for your custom properties. These information are just for your personal/organizational usage and are not used by the system.
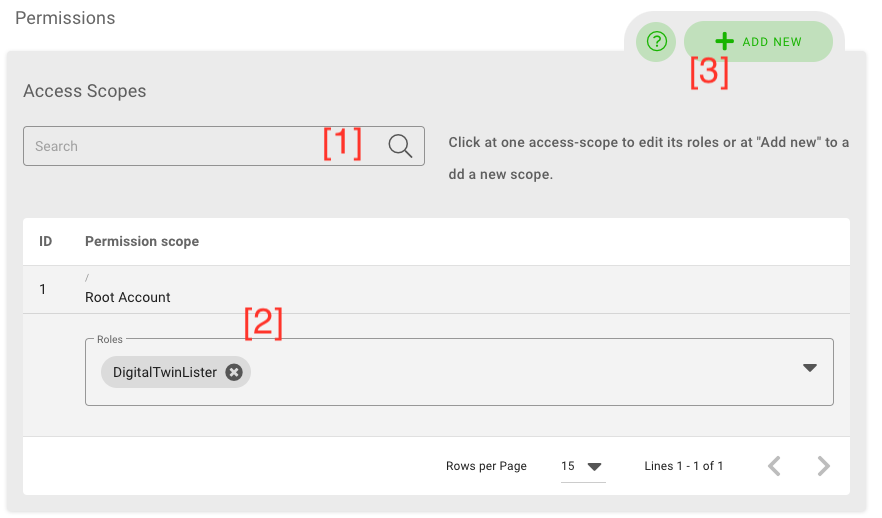
Permissions
In the permissions section, you can assign the role (and by this access permissions) of the user. niotix provides a fine-granular possibility to define access rights. All permissions are referring to a scope within the system.
A scope is a group of objects in niotix, which is independent from the account. It groups accounts and especially digital twins. By this, administrators can define different rights per user and digital twins, e.g. a user can have read-only rights for one digital twin but editing-rights for another.
In this section, you can search for certain scopes [1], click on the scope to see what roles are assigned for this user in this scope [2] or add a new permission [3].
Add new permission for a user in a scope
To add a new role to the user, click on the “add new” button. In the pop-up menu, at first select the corresponding scope (digital twin) [1].
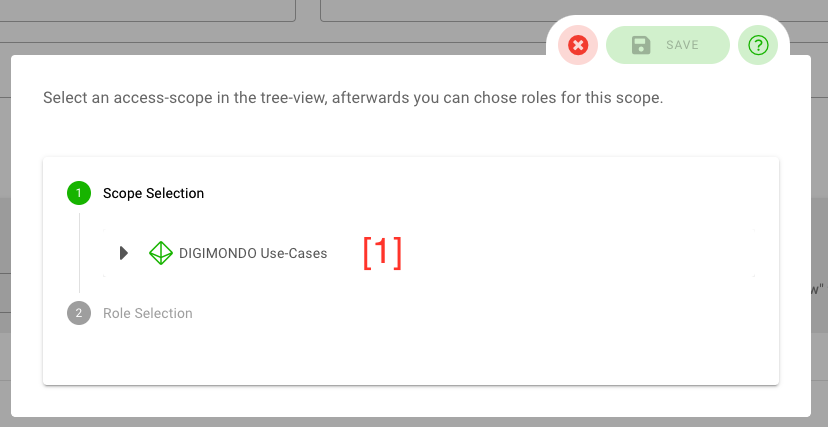
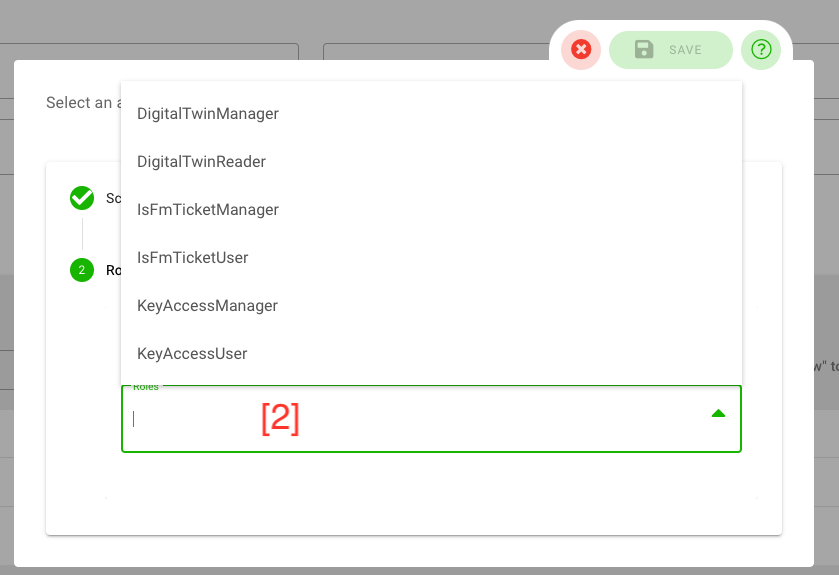
Next, you can select the roles you want to assign to the user for the selected scope [2]. From the dropdown list, you can select as many roles as you want. To save your selection, click on the “save”-button. You can cancel with the “x”-button.
A role is a collection of fine-granular rules, which can be set up in the “role editor”. Thus, the provided roles can be customized for each account and might differ from the screenshot below. To learn more about the standard-roles and their permissions and how to customize your roles, have a look in the section “role editor” below.
Add new user
By clicking on the “add new” button in the users overview, you can add a new user to the selected account. This works similar to editing a user as mentioned above, except for the initial selection of a scope and the possibility to define a default password:
- Root permission scope: Select the root scope, the digital twin or sub-twin, where this users belongs. After setting this value, the section for a fine-granular definition of scopes (”access scope”) will appear automatically (see section “access scope” below).
- Password: The password of the new user – niotix automatically proposes a password.
IMPORTANT: The proposed password is only shown once here! As soon as you save the account, there is - for security reasons - no possibility to look it up again. It is important to write it down if you need it – otherwise users can define a custom password with the invitation email or by resetting their password on the login page.
Permissions
To start the configuration of permissions for the new user, select the root permission scope for which you want to set the permissions. Adding permissions works similar as when editing accounts, see above for more information.
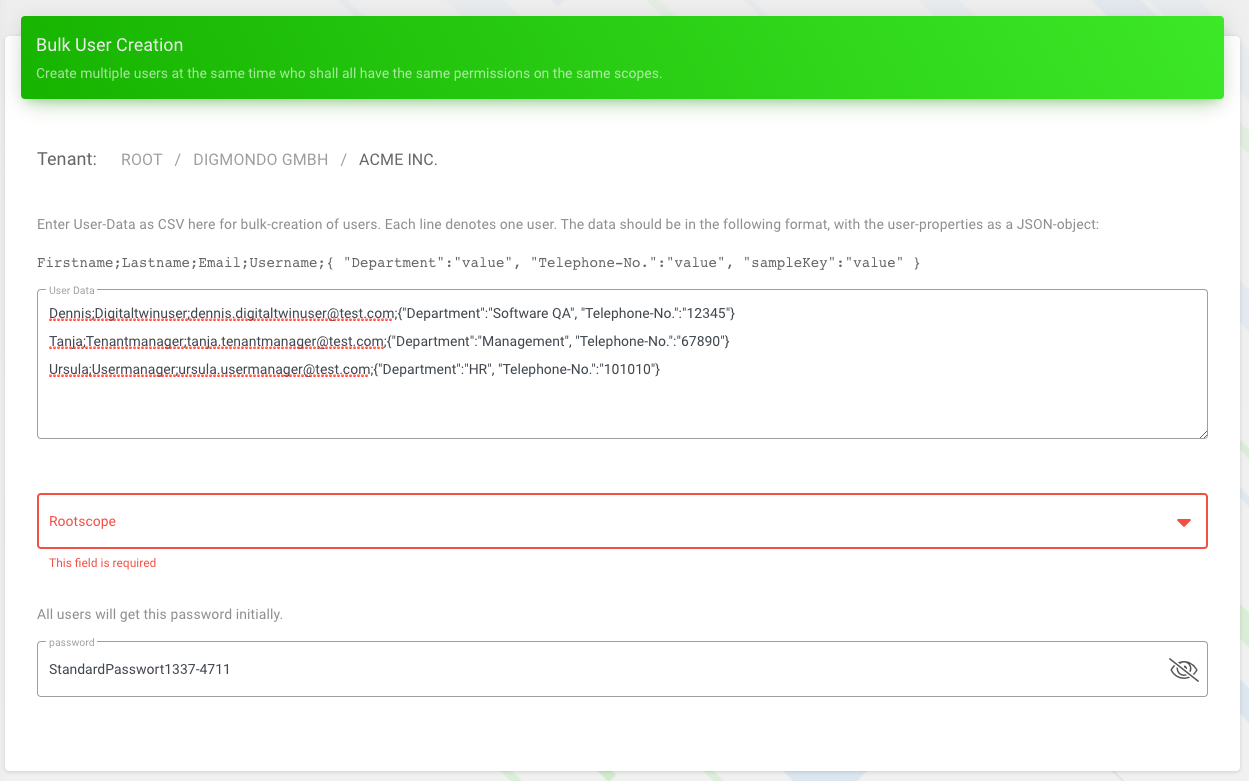
Import and add many users
To bulk-import many users, select the “import”-button from the account management view. In the textfield, you can copy and paste the list of users (one user per line) according to following template:
Firstname;Lastname;Email;Username;{ "Test":"value", "sampleKey":"value" }
In the textbox below the textfield, you can select the root scope as well as the initial password for all users.
After selecting the root scope, you can fine-tune your permissions as described above for single-adding new users.
Tab ‘API Keys’
In the tab “API Keys”, you can set up API keys used by 3rd party applications to access the niotix API. In niotix, you can define custom call-limits, expiration times and concrete permission for each key.
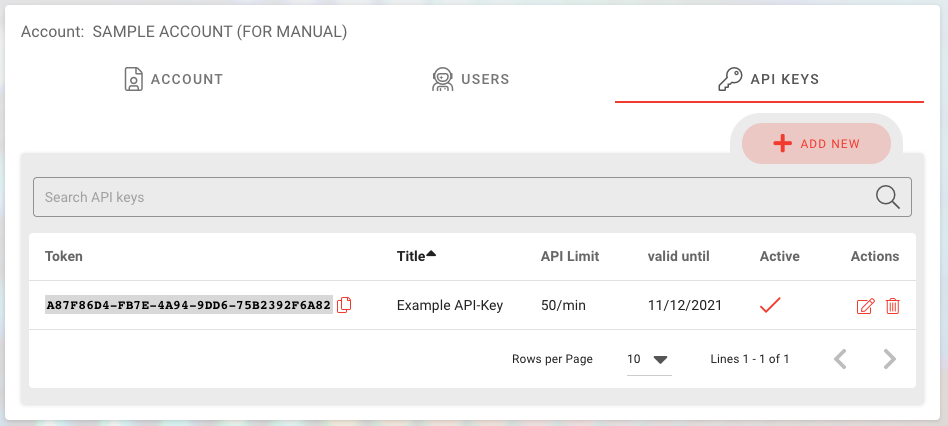
Edit existing API-Key
To edit an existing API-key, click on the pen & paper-icon in each row:
- Title: The name of the new API-key
- API call limit/min: Set the maximum number of calls per minute for the niotix XAPI and the Iot Data Hub niota 1.x API.
- Active: Activated by default. Deactivate if this key should not be usable anymore.
- Access Scopes: Adding permissions for the new API key works similar to adding new users. You first have to select the scope and then can assign roles. See chapter “add new user” above for more information.
Add new API-Key
By clicking on the “add new” button in the API-key overview, you can add a new API-keys to the selected account. This works similar to editing an API-key as mentioned above.