Rule editor
With the rule editor, you can bring your digital twin “intelligence”. Rules are used to evaluate incoming data from states and trigger actions, e.g. send emails or downlink packages to LoRaWAN-devices. By clicking on the “+"-button, the interface for adding new states opens.
Create event-based rule
To create a new rule, you have to go through at least 3 steps in the interface:
- Define the states to use (state metrics).
- Define the conditions to evaluate the state metrics (conditions)
- Define the action which is triggered when the conditions are met (commands).
- Optionally, you can test your rules (rule tester).
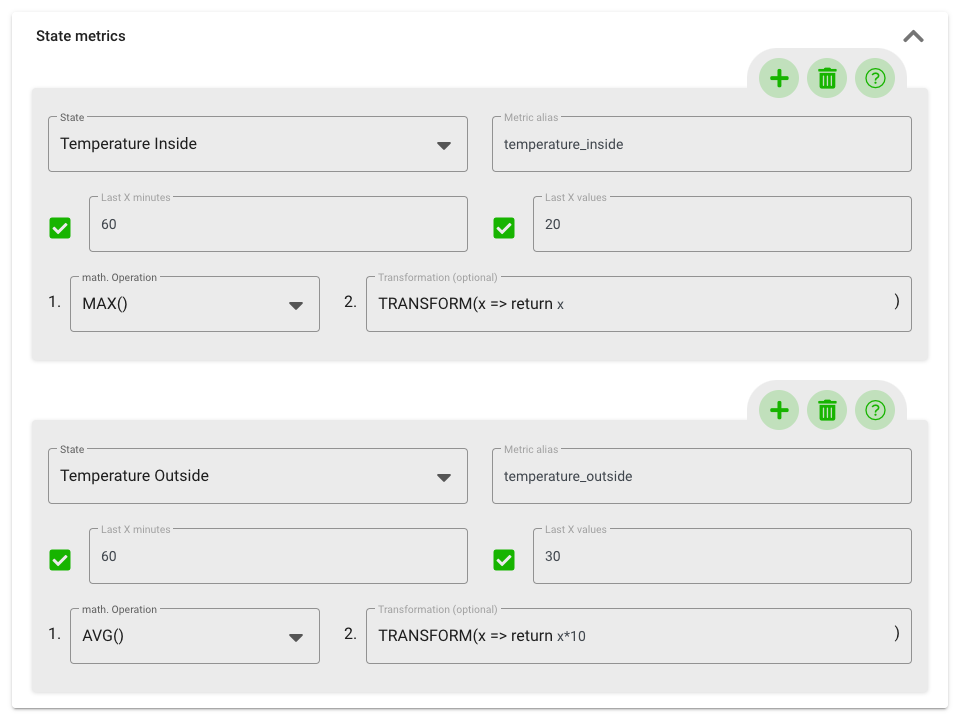
In the section State metrics, you can select the relevant states:
- State: Select the state from the dropdown list.
- Metric alias: Use this alias to define a custom name that can be used in the rule editor. By this, you can define self-explanatory alias instead of the state name. Or you can use the same state with different alias in your rule (e.g. to use the last value of a state as well as the average value to calculate if the current value is above the historical average)
- Last X minutes: Define the time interval from which the reported values for the rule originate. Click the checkbox on the left to use or not use this setting.
- Last X values: Define how many reported packets should be used. Again, click the checkbox to use or not use this setting.
- Math. Operation: Select the operation which should be supplied to the selected values: E.g.
SUM()to calculate the sum of the values ormax()to only use the highest value. - Transformation: Optionally, you can transform the incoming values with javascript-based functions. To do so, add your code as a return value. This feature is useful if you have different sensors reporting different formatting for values and you want to unify them (e.g. temperature-sensor 1 sends values with 3 digits after the decimal point and temperature-sensor 2 sends values with only 1 digit after the decimal point).
If both checkboxes (“Last X values” and “Last X minutes”) are activated, the conditions are logically linked with and. If both conditions are not met, the value of the metric is ‘zero’.
You can add more states for your rule by clicking on the “+” -button and delete states with the “trash bin”-button. Note: When testing the rule using the button, the state-name variable is not replaced by the concrete value.
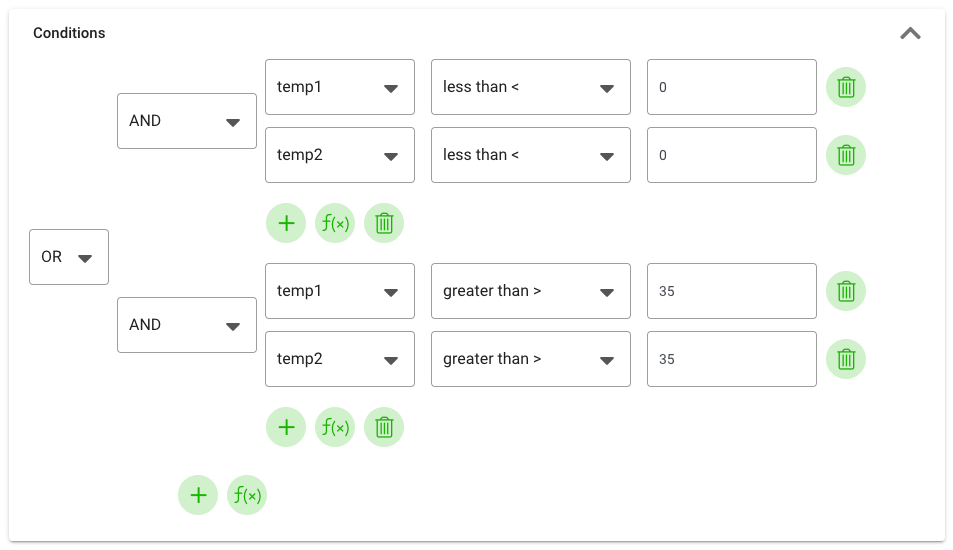
After setting up the states, you can define the conditions. This is done in 4 steps:
- Select the corresponding state metric defined previously.
- Select the evaluation type; e.g.
"greater than >","equal to =="or"greater or equal to >="from the dropdown list. - Set the value to be evaluated against.
By clicking on the “+"-button, you can add further conditions on the same level. With the dropdown on the left, you can choose how to connect them (“AND” or “OR”).
By clicking on the “f(x)"-button, you can furthermore nest conditions (sub-conditions).
To remove conditions, simply click on the “trash bin”-icon.
The following pictures give you an example for a condition to evaluate 2 temperature sensors and trigger actions if both sensors are above or below a pre-defined corridor:
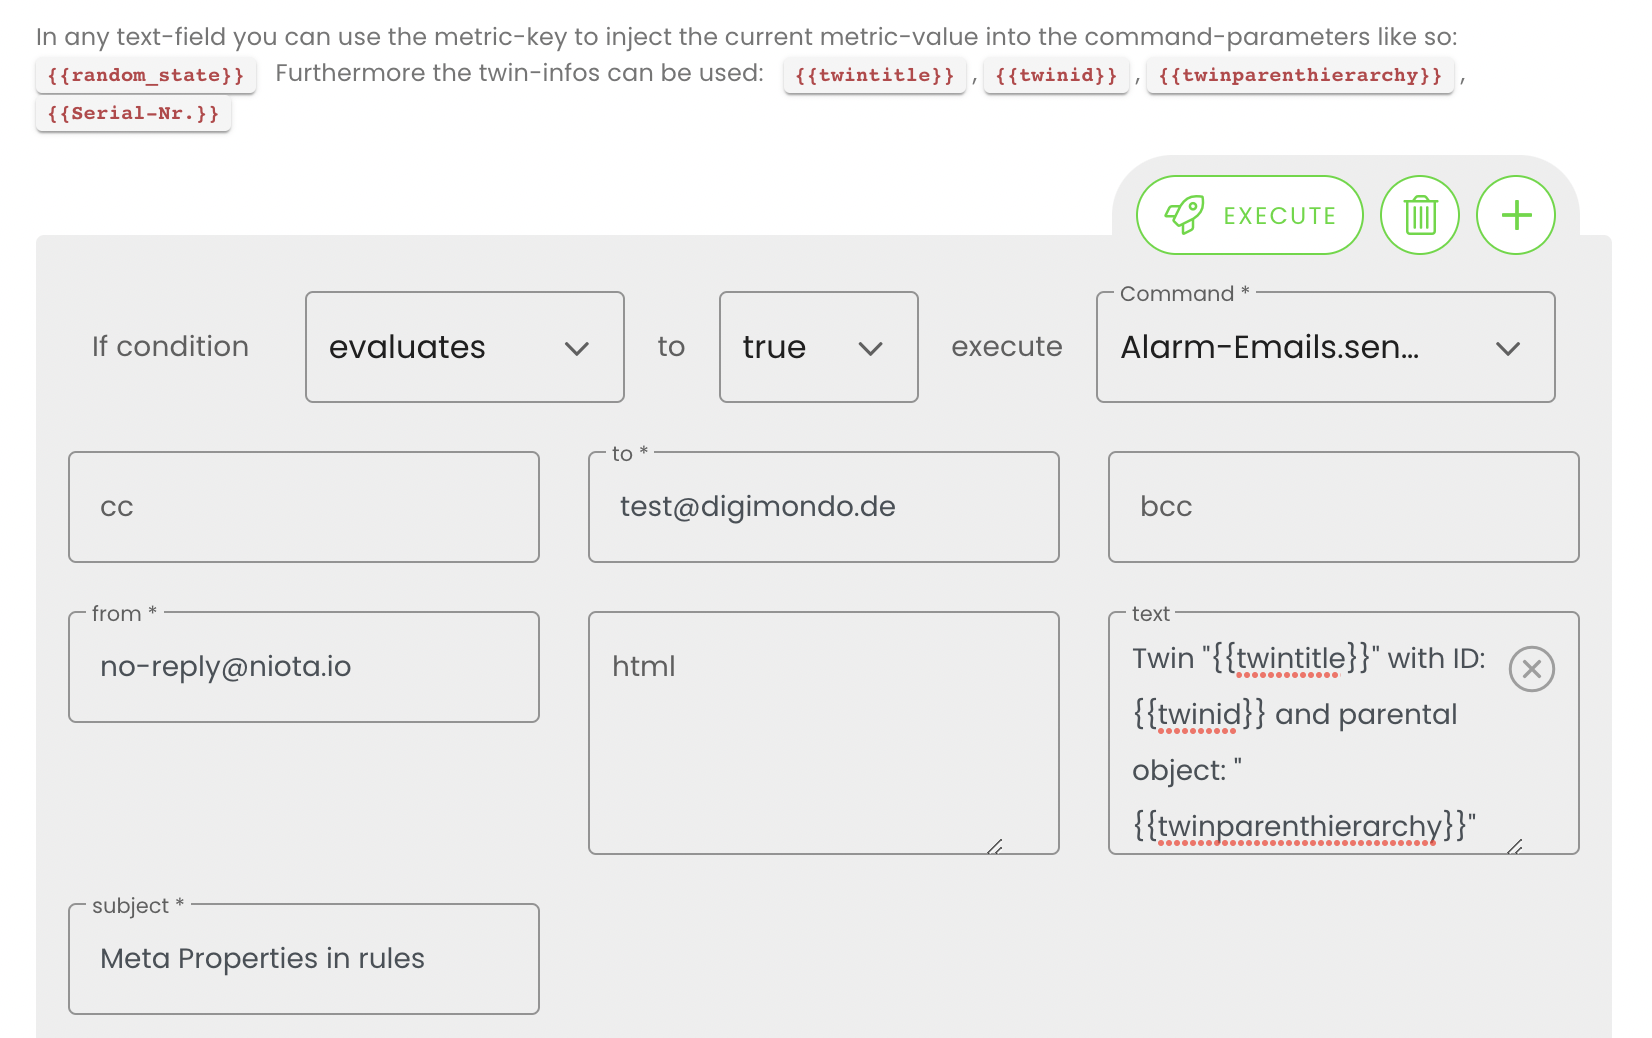
In the last step, you have to set up the action (command) that is triggered when the conditions are met:
- “If condition…”: Select the way of triggering: Choose
changesif the action should only be triggered when the evaluation changes (e.g. from true to false). Chooseevaluatesif the rule was evaluated and met the criteria (e.g. it was set to true in the past, got re-evaluated and the result of the evaluation is again true) - ”…to…”: Define if an action should be triggered when the condition is true (all conditions are met) are false (conditions are not met).
- ”…execute…": Here, depending on the configured bridges in your account, you can select e.g. to trigger an email, MQTT-message and in addition send downlink packets to devices in firefly or actility. Depending on the selected command, further possibilities will appear such as the receiver, subject and text of an email message. Furthermore, in each text field - also depending on the selected connector - in addition to the title, the ID and the concrete value of the previously selected data state, one can now also use its hierarchy and the custom properties by means of the syntax/ placeholders in rules of a digital twin. For example, when a rule is triggered, additional information can be provided to the receiving third-party system so that it can process the data automatically.
Optionally, as the last step you can test your rule with the rule tester:
For each state metric, you can define a sample value in the text field. With the “Test metrics and conditions”-button, the rule will be evaluated.
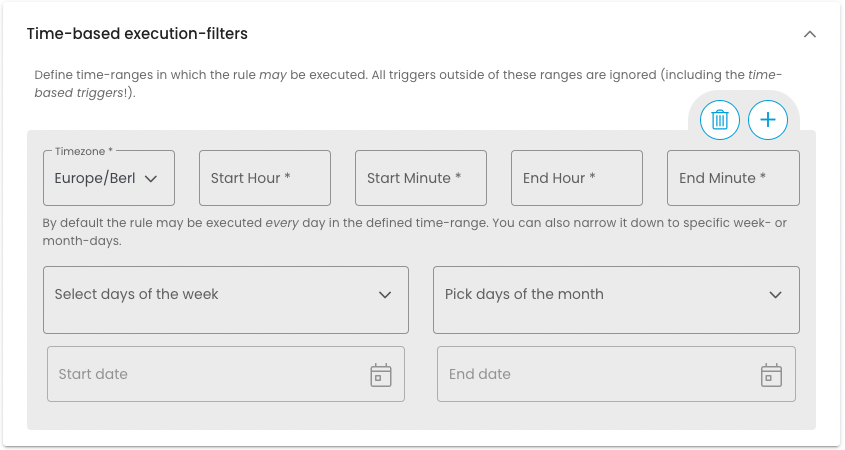
Create time-based execution-filters
If a rule is not to be evaluated in certain time periods, filters can be created for this. The rule is then only executed within the configured time periods. For example, a caretaker does not receive alarms for open windows during regular school hours.
Create a time-based rule
In addition to an event-based rule, you can set a time-based trigger. Here you can define times and rules at which the conditions defined above are additionally checked, even if no state value has changed or updated. The rule will continue to be executed outside the defined times when a state value is updated. If an evaluation of the rule is not to take place when the data state is updated, but only at the defined points in time, the option “ONLY use time-based triggers” can be used.
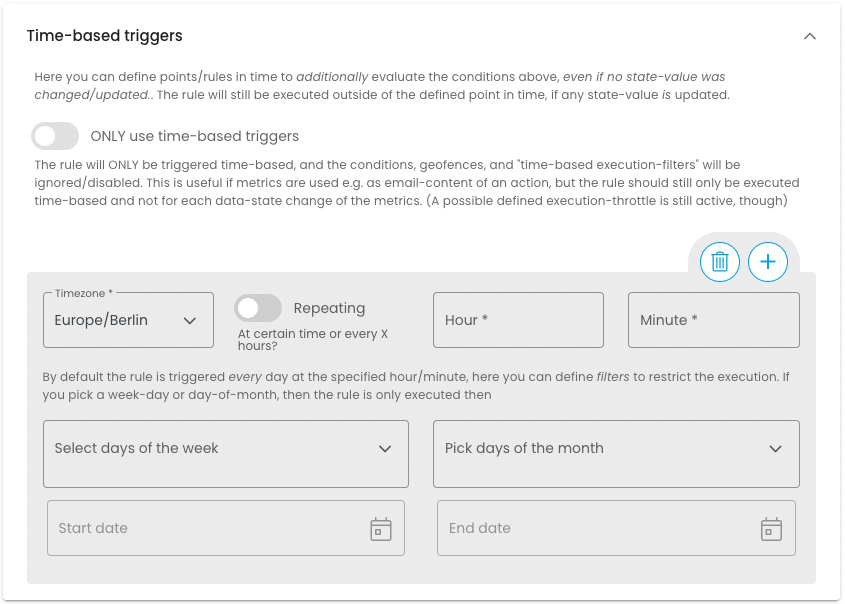
You can find this option when opening the window for creating a new rule under the fold-out box “Time-based triggers”. You can select whether the rule will be triggered in a repeating time interval, e.g. every 2nd hour at the 30th minute, on a certain day of the week or on a certain day of the month. At this set time, the specified condition is then automatically checked, and the command is executed only if the condition is met. Note: With the “Repeating” setting, the smallest possible interval is one hour. If a smaller interval is required, the rule must be created several times.
INFO: The interval for time-based trigger must be at least 1 hour. The user interface automatically corrects smaller intervals to avoid mistakes. If you need a smaller intervals (e.g. every 30 min.), you should create several rules with different starting times.
Under the field “Comparison metrics” you can now also use the mathematical operation “SINCE_LAST_UPDATE”, which in combination with the time triggers becomes a simple health check. The operation returns the number of seconds since the last update, regardless of what filters were selected above. However, this is not an active metric, it is recommended to work in combination with temporal triggers. It always needs a temporal trigger to be checked, as it does not return data point changes, but a period of time.
Create location-based rules
In addition to the existing event and time-based rules, you can use the locations of Digital Twins as additional triggers for a rule: For example, when a Digital Twin moves out of or into a defined area, an action is triggered. To use this rule, you set twins for the area as well as twins for the object.
To create a location-based rule, you need to go through the following steps in the user interface:
-
Click the plus button in the upper right corner to create a new rule.
-
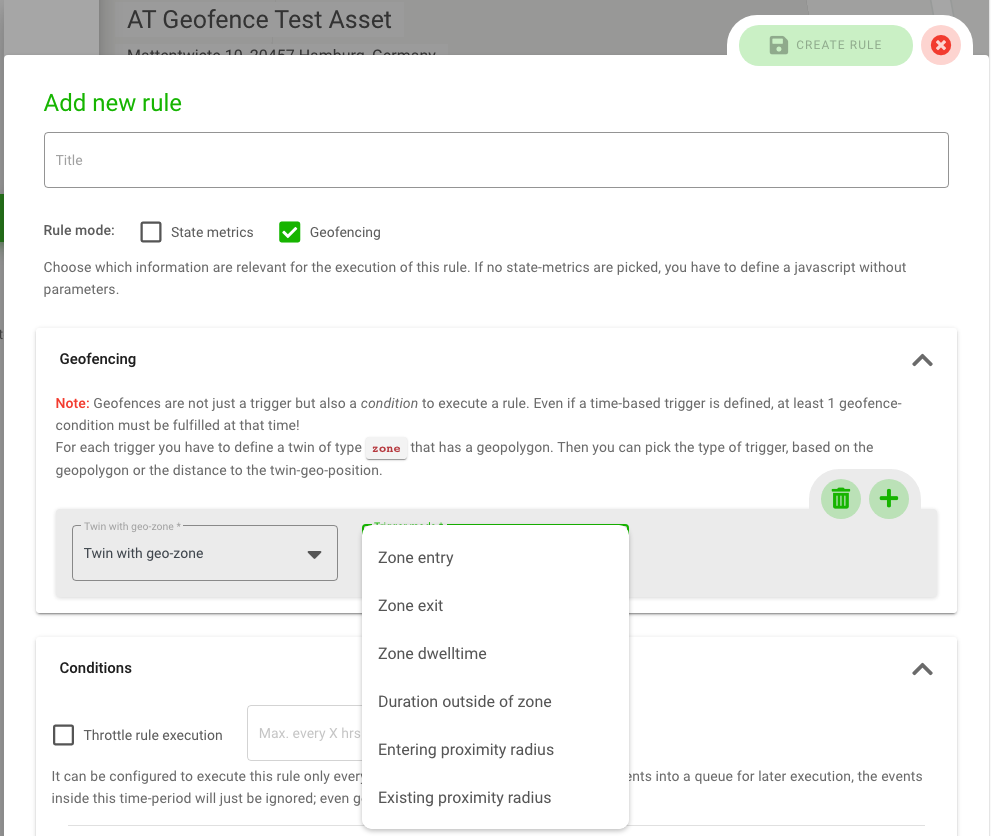
In the window that opens, click the “Geofencing” box. This will cause a second “Geofencing” tab to appear under “Rule Input”.
-
To create a location-based rule for the twin, you must have created a second twin of type “zone” before creating the rule, and you must have defined a polygon in its “Detail” tab. In the “Twin with geo zone” field you select this twin. Only twins of type “zone” will be displayed as clickable.
-
After you have selected the zone for your object twin, you define the “trigger mode” in the drop-down field next to it. Here you can choose between “Zone Entry”, “Zone Exit”, “Zone Duration”, “Duration Out of Zone”, “Entry into Radius” or “Exit from Radius”.
Some modes require additional information: When you select them, a third field appears in which you can enter information such as duration or meters. For example, as soon as your object enters the defined zone, the rule is triggered and the action you define further down in the box as for the other rules is performed.
You can also uncheck the “Data Point Comparison Metrics” box in the Rules mode and create a rule that will be triggered only in case of a location change. In addition, you can combine location-based rules with event-based or time-based rules, as well as Javascript conditions.
Note: Location-based rules are not only a trigger but also a condition for triggering a rule. Even if you have defined a time-based trigger for geofencing, at least one geofence condition must be met at that time to trigger the rule.
Duplicate rules
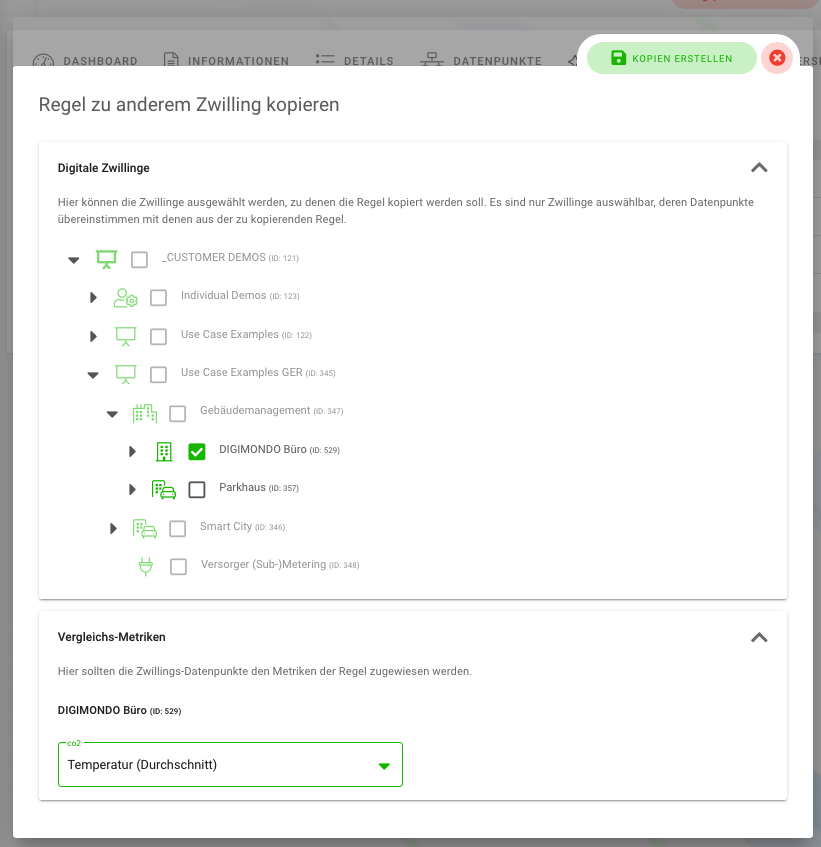
You can copy rules from one digital twin to one or more other twins in the same account.
-
In the overview in the “Rule Editor” tab, you will find the “Copy” button. When you click it, a new pop-up window will open with a list of the twins available to you. In this list, you can only select the twins that are in the same account of the original rule, as rules are account-dependent.
-
Once you select a twin, another field will appear at the bottom where you select the data points to which the duplicated rule in the other twin should refer.
-
The button “Create copies” will be activated and you can transfer the rules to other twins with one click.
Rule overview
In the last tab, you can see all the rules created for this twin and its child twins in a list. The rule includes title, assigned twin, last execution, last result, the commands for execution, and corresponding icons for rules based on time or geo-location.